

If you’re a serious woodworker, hobbyist, or a DIY enthusiast, having a workshop in your own home can be a great asset. Not only can you build whatever projects you desire, but it also allows you to store and organize your tools in one easy-to-access space. In this article, we’ll provide you with a comprehensive guide on how to build a workshop. Assess Your Space The first step in building a workshop is to assess the space you have available. Consider what kind of tools you’ll be using and how much space you’ll need to comfortably work on projects. Once you know what your space requirements are, you can begin to plan out your workshop design. Choose Your Tools Now that you know the size of the workshop you’ll need, it’s time to select the tools you’ll be using. From power tools to hand tools, decide which tools are essential ... Read More
Category: Blog
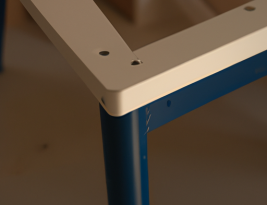
When it comes to adding height to a table, it can be a challenging task. Whether you need the extra height to make a countertop, a work station, or to give your furniture a unique look, it can be done with a few simple steps. Read on to learn how to make a table taller DIY. Identify the Need for Height Increase Before you begin, you need to determine why you want to make a table taller. Is it for storage purposes? Will it be used as a countertop? Determine the purpose of the table before you start the process to make sure you get the desired result. Gather Necessary Supplies Once you have identified the purpose of the table and the desired height, you can start gathering the supplies you will need. You will need the following items: Table Wood or metal legs Screws Drill Measuring tape Saw Also, ... Read More

Vinyl wraps are a great way to customize your car. Not only can you create unique designs and patterns, but you also have the option of changing the color of your vehicle without the need to paint it. Vinyl wrapping your car is a lot easier than you might think. With the right tools and some patience, you can complete the job in no time. Materials Needed Before you begin, make sure you have all the tools and supplies that you need. These include the vinyl wrap, spray bottle, squeegee, heat gun, and an Exacto knife. Additionally, you may want to use masking tape and a soft cloth or towel. Preparing the Car The next step is to wash and dry your car. This will ensure that the surface is free from dirt and debris. Once the car has been washed, you should use a microfiber cloth to remove any ... Read More
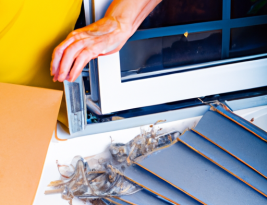
Soundproofing windows can be a great way to reduce noise pollution from outside sources. It can also reduce the amount of sound that leaks out of a room, which can be beneficial in a variety of scenarios. Fortunately, it is possible to DIY soundproof windows, although it requires time and effort. In this article, we’ll discuss the necessary materials and tools, as well as the steps that need to be taken in order to properly soundproof windows. Materials and Tools When it comes to soundproofing windows, you’ll need several materials and tools. These include: Acoustic sealant Acoustic foam Fiberglass insulation A caulking gun A utility knife A tape measure Staple gun Scissors A hammer Nails You may also need some additional materials, depending on the type of window and the soundproofing method you choose. Be sure to check the instructions for the specific soundproofing method you’re using to make sure ... Read More

Leather embossing is a craft that goes back centuries and is still widely used today. It can be used to create beautiful, intricate designs, or to simply add texture to leather goods. The process is surprisingly simple and can be done with minimal supplies. With a little bit of practice, anyone can master the art of leather embossing. Supplies Needed To start, you will need some basic supplies. This includes leather, an embossing plate, a rubber mallet, an embossing tool, and a piece of scrap wood. Leather is available in a variety of thicknesses, so be sure to select the thickness that best fits your project. An embossing plate can be purchased online or from a craft store. The embossing tool is a metal rod with a wooden handle that is used to create the design. The rubber mallet is used to tap the embossing tool onto the plate. You ... Read More

DIY projectors are a great way to make use of old or broken parts and create something new and useful. They are also an excellent way to teach yourself about the basics of electronics and how they work. If you’ve ever wanted to build your own projector, this guide will help you get started. Gather Materials Before getting started on your DIY projector, you’ll need to gather a few materials. These include: a broken or old laptop, a light source (such as an LED flashlight or a light bulb), a focusing lens, and a power source. You’ll also need some basic tools, such as a screwdriver, a utility knife, and a soldering iron. Prepare the Projector Once you have all the materials you need, you’ll need to prepare the projector. The first step is to open up the laptop and remove the LCD screen. You’ll need to remove any wires ... Read More

Coloring concrete can be an effective way to add a bit of personality to an otherwise dull surface. But, rather than paying a professional to do the job, you can take on the task yourself. With a few simple materials and a little bit of know-how, you can create a unique, colorful concrete surface in no time. Preparing the Surface Before you can begin to color the concrete, you must ensure that the surface is properly prepared. Start by cleaning the concrete with a pressure washer to remove any dirt, grime, or debris. Once the surface is clean, use a concrete grinder to smooth out any rough spots. Make sure to wear safety glasses and a dust mask when operating the grinder. Mixing the Concrete The next step is to mix the concrete. This can be done manually or with the help of a mixer. The concrete should be mixed ... Read More

When you have furniture in your home that is constantly sliding around, it can be annoying and even a safety hazard. If your furniture is sliding, there are several solutions you can try to stop it from moving. Here are some steps you can take to stop your furniture from sliding around. Identify the Problem The first step in stopping furniture from sliding is to identify the problem. Is the furniture sliding on a hard surface like tile or hardwood? Is it on carpet? Is the furniture too lightweight for the area where it is placed? Once you know the cause of the problem, you can take steps to fix it. Choose the Right Tools Once you have identified the problem, you can choose the right tools and materials to fix it. For furniture sliding on hard surfaces, you may need to get furniture pads, felt pads, or heavy-duty rubber ... Read More

A cracked phone screen can be a huge inconvenience, but it doesn’t necessarily mean you need to take your device to a repair shop. With the right materials and a few simple steps, you can easily repair the screen yourself. Assess Damage Before you begin, assess the extent of the damage. If the crack is small and doesn’t interfere with the touchscreen’s functioning, you can likely move ahead with the repair. If the screen is shattered and the touchscreen is unresponsive, you should consider taking it to a repair shop. Gather Materials You will need the following materials to complete the repair: Replacement Screen Screwdriver Adhesive Cotton Swabs Rubbing Alcohol Once you’ve gathered the necessary materials, it’s time to begin. Apply Adhesive Start by wiping down the frame of your phone with rubbing alcohol and a cotton swab. This will help ensure that the adhesive will stick to the frame. ... Read More

Covering open shelves with fabric is a great way to give them a modern, stylish update. The best part is, the process is simple and can be done without spending a lot of money. Follow the steps below to learn how to cover open shelves with fabric. Materials Needed To cover open shelves with fabric, you will need the following materials: Fabric with a pattern you like Scissors Staple gun Upholstery foam Hot glue gun and glue sticks Measure and Cut Fabric Start by measuring the length and width of your shelves. Then, take your fabric and cut it to the size of your shelves. Make sure to leave enough extra fabric to wrap around the edges. Attach Fabric to Shelves Once you have the fabric cut to size, you can start attaching it to the shelves. Start by stapling the fabric to the back of the shelves, making sure ... Read More
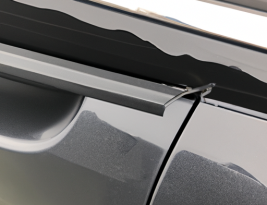
Black plastic trim is a feature of many cars, and restoring it after it begins to fade is a great way to give your vehicle a much needed facelift. While there are plenty of options for professional trim restoration, the process can be done yourself with a few simple steps. Here’s how to permanently restore black plastic trim DIY. Preparation The first step to restoring your vehicle’s black plastic trim is to prepare the area. Start by cleaning the trim with a mild soap and water solution. For stubborn dirt and grime, use a soft, non-abrasive brush to scrub the area. When you’re done, make sure to thoroughly dry the trim. Cleaning Once the trim is dry, it’s time to start cleaning. Use a plastic cleaner designed specifically for car trim. This will help remove any embedded dirt and grime and bring back the trim’s original shine. Follow the instructions ... Read More

Gather Materials DIY LED lights are a great way to light up your home or workspace. They are inexpensive, easy to install, and can be used to accentuate furniture and create interesting effects. To get started, you will need to gather the right materials. Here is a list of what you will need: LEDs A power supply A soldering iron A breadboard Wire A resistor You can find all of these materials at your local hardware store or online. Set up the Circuit Once you have all the materials, you can start to set up your circuit. Start by connecting the power supply to the breadboard. Then you will need to wire the LEDs to the breadboard. Make sure that each LED is wired in the correct direction. Next, you will need to connect the resistor to the circuit. This will help protect the LEDs from being damaged by too ... Read More

Indoor Activities When you’re stuck at home and looking for something fun to do, there are plenty of indoor activities to keep you occupied. From cleaning and organizing to catching up on your favorite shows, there’s something for everyone. If you’re looking for something to clean up, start by organizing your closet. Get rid of the clothes you no longer wear and donate them to a charity. You can also organize your kitchen cabinets and pantry, get rid of expired food items, and declutter your living space. If you’re looking for something to do that’s a bit more fun, why not try your hand at some board games or puzzles? You can also catch up on your favorite shows or watch a new movie or documentary. Reading a book or magazine can also be a great way to pass the time. Outdoor Activities If you’re looking for something a bit ... Read More

Cold weather can wreak havoc on outdoor water pipes. When temperatures drop below freezing, water inside the pipes can freeze, causing the pipes to burst. This can lead to costly repairs and property damage. Thankfully, with the right preparation and supplies, you can keep outdoor water pipes from freezing and prevent damage to your home. Preparing Your Pipes The first step in preventing frozen outdoor water pipes is to make sure they are in good condition. Check your pipes for any signs of damage or wear, and have them repaired if necessary. Make sure the pipes are properly sealed and insulated, and pay special attention to areas where the pipes may be exposed to the cold. Consider wrapping any exposed pipes with insulation materials, such as foam pipe wrap, to add an extra layer of protection against the cold. Insulating Your Pipes Insulation is key to keeping your outdoor water ... Read More
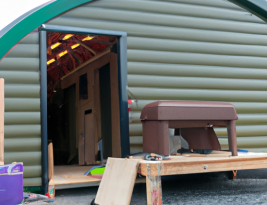
A workshop shed is a great way to keep your tools and materials organized and protected from the elements. With a little bit of planning and the right materials, you can easily create a shed that will last for years to come. Here’s how to build a workshop shed. Gather Materials Before you start constructing your shed, you'll need to gather the materials needed. You'll need the following items: Wooden boards Nails Screws Hammer Saw Drill Measuring tape Level You may also need additional items, such as paint, caulk, and weather stripping, depending on the type of shed you're building. Design Your Shed Once you have all the materials, it’s time to design your shed. You'll need to decide on the size, shape, and materials you want to use. You'll also need to decide on the location of the shed, as this will affect the design and materials you use. ... Read More
Types of Air Compressors When it comes to using air compressors in workshops, the type of compressor matters. There are two main types of air compressors – reciprocating and rotary screw. Reciprocating air compressors are the most common type used in workshops, and they use pistons to pressurize air. Rotary screw air compressors, on the other hand, use two intermeshing rotors to pressurize air. Reciprocating air compressors are ideal for lower pressure applications, such as powering air tools or blowing away dust and debris. They are usually cheaper than rotary screw air compressors and are relatively easy to maintain. Rotary screw air compressors, on the other hand, are better for higher pressure applications, such as powering machinery or running air lifts. They are more expensive and require more maintenance, but they also last longer. Calculating the Size of Air Compressor Once you’ve decided which type of air compressor is best ... Read More
Every homeowner dreams of having a dedicated space for their projects, tinkering, and repairs. Having a garage workshop can be the perfect solution for those who want to pursue these activities without taking up valuable space inside the home. Building a workshop in the garage is an ideal way to maximize every square foot of the home and create a more organized and productive workspace. Planning and Preparation Before building a workshop, it is important to consider the needs of the homeowner and plan accordingly. First and foremost, measure the space and determine the size of the workshop. It is important to plan for adequate storage and workspace, as well as the necessary electrical outlets and lighting. Consider the type of projects that the homeowner will be doing and the tools and materials needed. This will help determine the best layout and design for the workshop. Design and Layout The ... Read More

Workshops, whether in the garage or elsewhere, can get hot. This can lead to a number of problems for both the tools and the person working in the space. Here are some ways to cool a garage workshop. Insulating the Workshop Insulating the workshop is a great way to keep the heat in when it’s cold out, and keep the heat out when it’s hot out. This can be done with spray foam insulation, or rigid board insulation. Both of these options can help keep the temperature in the workshop more consistent, and help keep it cooler in the summer months. Ventilating the Workshop Ventilating the workshop is also important in keeping it cool. Making sure that there is adequate ventilation in the workshop will help keep the air moving and keep the temperature down. This can be done by installing fans or vents that will bring in cool air ... Read More

Most workshops require a certain amount of light to be safe and efficient. It’s important to understand how many lumens per square foot of space you need to properly illuminate your workshop. In this article, we look at the basic lighting requirements, how to calculate lumens per square foot, recommended illumination levels, and lighting options for your workshop. Lighting Requirements When lighting a workshop, it’s important to understand the amount of lumens, or light, that is required. Lumens measure the brightness of a light source, and the amount of lumens needed for a particular space depends on the task. Generally, more complex tasks require more lumens, while simpler tasks require fewer lumens. Calculating Lumens per Square Foot To calculate the amount of lumens per square foot of space, you need to figure out the total amount of lumens required for the space. This number can be determined by adding up ... Read More